Poster Project – My Tree

Screen Shot 2014-12-24 at 19.18.18


Okay so now I have added all my faces to my tree?? But… I don’t like it still… There is just something I don’t like about it thats making me not love it as much as I should. I think Its the colours! The black background NEEDS TO GO! though it was never gonna stay but I need to know what I want for this poster. So for now Im leaving it Like this but when I come back to Bournemouth I’m Going to have a clear Idea of 3 things…

1. Colours? – Use Blue for the link with Facebook more?

2. Explain? – What message am I trying to tell the audience?

3.  Appealing? – Right now it don’t look too nice so what can I do to make it more interesting to look at as a poster?

So after christmas I should have a clear route I’m going to take with this poster and that should help me improve this and make it look so much better than what it is currently looking like.

Poster Project – More the Merrier :)

Screen Shot 2014-12-22 at 20.28.40 Screen Shot 2014-12-23 at 22.19.09 Screen Shot 2014-12-24 at 18.51.11 Screen Shot 2014-12-22 at 20.42.27 Screen Shot 2014-12-23 at 22.30.30Screen Shot 2014-12-22 at 22.00.00 Screen Shot 2014-12-23 at 22.24.13 Screen Shot 2014-12-23 at 22.54.38 Screen Shot 2014-12-23 at 21.27.39 Screen Shot 2014-12-24 at 16.01.36 Screen Shot 2014-12-24 at 16.13.40 Screen Shot 2014-12-22 at 21.03.19 Screen Shot 2014-12-24 at 17.54.04 Screen Shot 2014-12-24 at 18.34.25 Screen Shot 2014-12-23 at 22.11.24

So here you can see Ive made many more faces! Lots more! While being stuck at home with nothing to do I thought I would get more done with my Project. So i’ve started by drawing out all the faces i’m hopefully using in the Friendship Tree! So after I completed one of these beautiful faces I them grouped the hair and face… And more in other cases like ears and earrings. This was so I could move them around easier. Then one by one I added them to my tree. Some of my friends I had found it hard to find an image of them facing forward so I had to take old ones and change the hair colour to what they have now, and in others not all the head was in the frame of the image or in a hat so i’ve had to guess what it looks like for them. But finally all my faces are done!

Screen Shot 2014-12-23 at 22.03.37 Screen Shot 2014-12-23 at 21.54.39 Screen Shot 2014-12-23 at 22.44.16  Screen Shot 2014-12-24 at 15.02.10       Screen Shot 2014-12-23 at 22.50.35 Screen Shot 2014-12-23 at 23.05.04 Screen Shot 2014-12-24 at 14.52.15 Screen Shot 2014-12-24 at 16.06.47 Screen Shot 2014-12-24 at 15.56.54 Screen Shot 2014-12-23 at 23.00.07Screen Shot 2014-12-22 at 21.22.08Screen Shot 2015-01-08 at 20.40.50 Screen Shot 2014-12-24 at 18.40.56

Poster Project – Adding a few more People

Screen Shot 2014-12-21 at 21.53.00Screen Shot 2014-12-21 at 22.16.41Screen Shot 2014-12-21 at 22.05.02Screen Shot 2014-12-21 at 22.26.03

So just like before, What I did with Ashleigh’s face I have also done here with 4 more of my friends. Sian, Zoe, Emily and Jasmin. Im working in order of when i got to know each of my friends. So I started of with Sian as Iv’e known her from primary school just like Ashleigh. I finished drawing Sian but for some reason she kept hiding behind the tree and no matter how many times i pressed bring to front, She staying hiding, So i had to place her to one side for a bit. then I made Zoe and Emily who I knew from my 1st High School, so I am already starting to branch out on the tree. Then lastly tonight I stopped with Jasmin! my 1st friend at my 2nd High School. After doing this I went back to Sian who I noticed I had drawn in the wrong layer and that was why she wouldn’t come to the top as the layer she was on was under the tree layer. I fixed this and she was able to join the others. Also I made the faces and hair on different layers so I grouped them when i was finished so I was able to move them around.

Screen Shot 2014-12-21 at 22.28.06Screen Shot 2014-12-23 at 22.19.44 Screen Shot 2014-12-21 at 22.28.00

Poster Project – Key Member of the Tree

Screen Shot 2014-12-21 at 19.13.48

Although I started by drawing Ashleigh 1st I thought I will need to add the key member of all of this! Which Is ME! so I got my profile Picture at this time and Just like the rest, Brought the image into Adobe Illustrator and used the pen tool for the hair and face. My hair was more difficult than some due to having more than one colour in my hair. So I had to make a new layer for the pink part of my hair. Again Im not adding any facial features so it was more of the symbol again.

After I made my face how I like it I then grouped it together and resized it to be bigger than Ashleigh’s face and not too big to take up the whole off the trunk. After this I also made some modifications to the hair as it was hinted pink before and I wanted it to look more bleach blonde like it is. Also I changed my skin tone as when I brought it over to the FriendTree I looked more white than I really am so I changed it a tad.

Screen Shot 2014-12-21 at 19.45.21 Screen Shot 2014-12-21 at 21.04.50

Poster Project – Adding My Social Network

Screen Shot 2014-12-21 at 18.51.13            Screen Shot 2014-12-21 at 19.01.55

So what I’m doing now is going on my Facebook friends list and working my way down it. I started with my friend Ive known the longest, Ashleigh Adkins. The girl in the image above is a friend I have known since Pre-School. After Pre-School we went to the same primary school and high school, Even tho I moved high school in year 9 we still remained friends. Until my 2nd year of college where Ashleigh dropped out of six form and also came to college and we saw each other most days again, Until now… Seeing as we both have left for different Uni’s. Ashleigh is one of my key main friends in my life and no matter how far away we are I know I will always have her, She will always be the strongest branch in my tree.

So what I did was go onto Ashleigh’s Facebook profile and stole her profile Photo, I couldn’t take the 1st one due to not being able to see her full face. I need to see the full face or at least most of it in order to trace it in the same way as I did the tree. After tracing it I would use the eyedropper tool so select the right shade of colour to match the right skin and hair tone. Although these aren’t going to be 100% right due to different lighting in the photos and I’m unable to get all of my friends list to take a perfect photo in the same lighting, Also the fact they are taken from the profile photos of themselves makes it more personal and more for the topic I’m doing for my poster. Like I said in my sketch designs, Im only going to draw the hair and face, This way its more a symbol than a drawing.

Next I then Changed the direction of the hair as she is tilted to one side, So I rotated the outline I made and then started playing with the lines at the end out her hair so it stands more freely and not look like she is tilted. Even though I have done this I may go back as I still have all the little flakes in the hair that you saw then the hair was dangling but if the head is more upright its wouldn’t flake as much and would just hang downwards.

Screen Shot 2014-12-21 at 19.12.24

Poster Project – Putting my Ideas into Illustrator

Screen Shot 2014-12-15 at 11.11.28 Screen Shot 2014-12-15 at 11.21.11 Screen Shot 2014-12-15 at 11.16.20

So i’m sitting on the train, On my way home for Christmas and I thought why not be productive and start my poster in illustrator for the whole trip back. I downloaded Adobe Illustrator Trial last night, So I have 30 days to use the program and finish my project which should be plenty of time from today.

So from my final idea I had all of my Facebook friends on a Family tree so what I needed first was a tree. So I looked on google for a nice tree with some branches and came across this one above. I then used the pen tool like I had learnt in the workshop when copying the Starbucks logo a few weeks back. I then used this pen tool to outline the tree to get every bump and bobble. After this I was able to make the tree trunk for my tree, I did this by doing exactly the same as I did the top half of the tree.

After doing all the outlines I was able to colour in the tree, So I went classic and drawn the tree with nice green leaves and brown branches and trunk. I also added a shade onto the tree as later on I am planning to do a shadow of the tree in the background. In the meanwhile I just changed the background to a black with a gradient of white in the middle but this may change depending if I like the shadow or not.

Screen Shot 2014-12-15 at 11.28.04

Poster Project – What is your social Network?

Screen Shot 2014-12-21 at 21.29.54

-What is your social network? Visualise your Facebook social network using Facebook’s classification of close friends, family and acquaintances

So what is my Social Network? Facebook!? Well yes! Facebook is known to be the biggest Social Media Network going at this day and age. So what Im basically planning to do with this is get my own Facebook page out, As who do I know better then myself and my friends, Above here is a screenshot of my very own Facebook friend list and i’ve just noticed that the 4 friends it has shown there are my best friends in order… so top left is my primary school BF, left bottom is my secondary school BF, top right is my college BF and lastly the bottom right is my uni BF.

So what i’m planning to do is a Family Tree of some sort. I will have myself on the trunk of the tree and then the core branches are my primary school friends then that will branch out to my high school friends and keep branching out. This will continue in till the last ones which will be my uni friends as i’ve just got to know them. Then I will have all of my friends in order of myself knowing them on a friendship tree as such.

Illustrator #3

Screen Shot 2014-12-11 at 10.50.00 Screen Shot 2014-12-11 at 11.51.47 Screen Shot 2014-12-11 at 11.51.58

In illustrator today I learnt some more on making 2D images look a bit more 3D. So to start with I wrote the letter T for Tina, then I placed a purple box around the letter T. After this I then made a rectangle which I rotated and made sure the sides of the rectangle both linked with the letter T so they was touching. After this I used the shape selection tool and deleted the top half of the rectangle above the T and bottom the rectangle outside of the box, This will be my shadow for my T so it looks like it is 3D. I had to add the gradient into the shadow so It would shade from place to pink. this gives the illusion of a back drop shadow which makes it look 3D.

Next I made a Pepper! Not to good but for a 5 min sketch its okay. So i started by looking at a pepper and drawing the front of the peeper followed by the different layers that followed behind. After this I then coloured it red and green and it started to look some what like a pepper. After this I then added the refection from a light? onto the pepper. I was able to do this by working on a grid with points where I was able to change the colour of each point to white or a lighter red to add shading from the reflection. But in the process of doing this the black outline has disappeared and I need to find out why as it don’t look right without it.

Next I made a 3D ball, this was quite simple. All I had to do was draw a circle and then a smaller white one inside of the bigger one and feathered it so it got lighter and faded out. Next I made another circle but this time a bit darker purple than before, after this i changed the gradient so it was go from dark to light and this gives a nice 3D look to the ball,

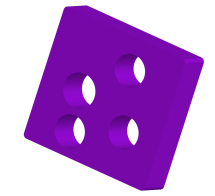
Another simple one where I just drawn a square with a few circles inside. After this i then used the 3D tool to turn the shape 3D. I then was able to change the depth of the rectangle so it can be as thick as I wanted and also I was able to rotate the shape around and look at in any way I wish so i know its the way I want it to be.

Next I typed my name out! This is quite boring but just so show I could do it, what i did was use the gradient tool and just added in lots of colours which some i deleted again and the rest I just changed the colours to ones I like. Then look at my name I typed out to watch it change and have the colours | added in just the right order and measurements to get this nice muti-coloured effects that I applied. I can also use this effect on more than just words.

Lastly I added a few random different shapes all in a line going downwards. Next I cut the shapes in half so I was just left with a line of half shapes. I then went into the 3D menu and found Extrude and Bevel where I was able to make this funky shape on the end. Not sure what it is but looks funky and sure ill fine a use for this effect in the future.

Screen Shot 2014-12-11 at 11.52.12 Screen Shot 2014-12-11 at 11.52.04 Screen Shot 2014-12-11 at 11.52.23

Poster Project – One of my Final Idea Sketchs

Photo on 09-12-2014 at 17.10

Here I have been branching out my ideas… See what I did there? branching? Its a tree!! Oh never-mind 😀 So the ideas for my poster Idea was that I wanted it to be a nice 2D flat design that is colourful yet quite discreet. So I started  out with a tree with some core branches, these core branches will me my 1st childhood friends in which I would have made in primary school or even pre-school.

I then branched out on this and included the friends I had then made in high school which also branches out more due to the fact half way though high school I moved school and got to know even more people. As I grow up and got older and wiser I started to adventure out of my home town and go to the cities of England, going to different events and concerts, this also made my friend list grow bigger. After high school I then went to college for 3 years and took 2 different courses which means I then again was making even more friends and also getting around and going to different places and meeting new people. Lastly I then took a giant leap to Bournemouth! As I now attend Uni! This meant because I moved over 200miles aways from home I am forced to meet new people and make even more friends as I make my new life down here. This shows my friendship group is always growing but at the same time also shrinking due to knowing so many people and moving away I have also lost touch with some of my friends.

All the friends I have on this tree are from my Facebook friends list, so everyone I will list on my friendship tree are people I still have contact with and talk too. Also I have included them friends that everyone has on their friend lists, the ones you may only talk to once a year if that and they are just there on your Facebook for no reason. I think I have it easier than some people, I don’t like having 1,000s of friends which I did have back in 2010 but then thought whats the point? and started a new Facebook with the friends I like and not just people I know. I thought of adding more to this, such as my good friends that I have had but then lost over the years I thought I could have fallen friends of the list or broken branches. When it comes to designing it I think I may draw it and see if I like it or not, as it might be too much for this poster.

Photo on 09-12-2014 at 19.03

Using Brackets #5

Screen Shot 2014-12-09 at 15.56.26 Screen Shot 2014-12-09 at 16.13.50 Screen Shot 2014-12-09 at 16.36.34

Back to brackets, Started today with a code for a webpage with 150 boxes. The task at hand today was to change it to 4 boxes under different names, with difference images and text. So first I started by changing the number of boxes to 4, simple… No. Instead of it being so simple I had too add a thing called a ‘array’ under the “box” tag. An array is a verbal that contains more one value, So i added the names Tina, Ruth, Ester and Milly. These are random names but as an array you can add as many as I like and it will make a new box with the name you added. This is due to adding the number of boxes code of $x++ so it will increase the value by one, so as the boxes are numbered by 0, 1, 2 and 3 but I could add more if I wanted to.

Next you would have to go into the Box tag and change the title tag to $names [$x] this means the the value of the amount of arrays I have will add up, This ensures I that each time I add another array, It will add itself into a new box join inline with the others on the page by linking to the number of boxes with the $++

Screen Shot 2014-12-09 at 16.36.50

I then added more arrays for the Description and the images the same way as I just did the names for the boxes. I did come across a few problems when I added in the images as they were different sizes. I then fixed them so they were all the same size and reloaded the page and could see they were all inline and looks pretty.

Then I changed the description to add more to the page but then due to the amount of text I added was different, this made the boxes disfigured and my Task for next time will be to sort out how to fix this and make it fix correctly. By the end of the workshop I managed to complete the task and understand how to add arrays in my work.

Screen Shot 2014-12-09 at 16.24.48 Screen Shot 2014-12-09 at 16.34.22 Screen Shot 2014-12-09 at 16.34.59